PDF Creation Within SAP R/3
SAP offers a feature to create PDF files from spool requests that can then be downloaded directly to your computer. Call the transaction SA38 and enter the report name RSTXPDFT4. You can either generate the PDF in foreground, or in background.[For longer lists the background execution is of course to be preferred.] Enter the no. of the spool request you want to be printed as PDF,and enter the correct PDF name with the corresponding download path. Then execute the report via F8. The PDF is then downloaded to the file of the selected path.
Useful ABAP Tables & Function Modules
- To find all the tables used in a transaction use table : D010TAB (Get the main program of the transaction from SE93)
- To find all the tables which contains a specific field use table : DD03L ( For text DD03T)
- To find all the segments that contains a specific fields use table : EDSAPPL
- To find all the Idoc basic type that contains a specific segment use table: IDOCSYN
- To find all the Idoc extensions that contains a specific segment use table: CIMSYN
- To find all the parameter Id Use table : TPARA
- To get the main program of a include use FM : RS_GET_MAINPROGRAMS
- To get Function Modules and Includes Belonging to a Function Group : FUNCTION_INCLUDE_INFO, FUNCTION_INCLUDE_SPLIT
- To get all the inactive object by username Use table : DWINACTIV
- To get all the includes for any main program: table D010INC To get relations between classes/interfaces: table SEOMETAREL
- To find call relations between programs - function module - external subroutine calls etc: Table CROSS
- To find EDI Custom Extension Types use table : EDCIM
- To find the IDoc types use table : EDIDO ( Value table for IDoc types )
- To find IDoc Assignment of Function Module to logical message and IDoc type use table : EDIFCT
- To find IDoc Function Modules for creating file names use table : EDIFM
- To find EDI Message Types and Assignment to IDoc Types use table : EDIMSG
- To find all EDI segments of current release use table : EDSEA
- To find Views of customer model use table : TBD00 ( ALE Models )
- To find Communication relation between systems in ALE use table : TBD03
- To find Process code for outbound processing ( EDI ) use table : TEDE1
- To find Process code for inbound processing ( EDI ) use table : TEDE2
- To find Function modules for inbound ALE-EDI use table : TBD52
- To find all Status of IDoc use table : TEDS1
Self defined transaction code in SAP: SE93
One of the most asked question in a SAP interview is whether it is possible to have a self defined transaction code in SAP. The answer to the question is simple and if given tactfully can impress the interviewers. To start with, yes, self-defined reports, transactions or functions are possible within SAP. There might be numerous reasons why a company might go in for customized transaction codes or for that matter reports. To cater to this demand, SAP allows creation of user-defined transaction codes. Creating a transaction code allows the user to speed up access to specific reports/programs as the user no longer needs to use transaction code [SA38]. Thus, instead of using T-Code SA38, then entering the program name or report name and pressing execute, the same can be done directly through a pre-defined T-Code. The user can then simply use a transaction code, which will automatically open the program. In SAP custmoized T-codes can be created through transaction code [SE93].
Differences between LSMW and BDC :
LSMW is generally for normal SAP applications, while BDC is mainly for any customized applications.
LSMW is a Non-SAP to SAP communication TOOL, whereas BDC is a SAP to SAP communication UTILITY.
LSMW is a more user-friendly tool, through which one can do the same work as the BDC. One just has to follow the 14 steps.
LSMW offers four ways to import data into SAP, and they are:
BDC, Direct Input, BAPI(BO) and IDOC.
BDC(Batch Data Communication) is basically a program which is either generated by SAP after a recording or programmed by a abaper.
It’s like running the transaction manually but all the data is populated in the screens automatically.
It is a bit complex when the screen contains Table Controls.
LSMW provides various methods for migration of data, namely those of Direct Input, Batch Input recording and IDOC.
BDC however simply makes use of recording. There are two ways of implementing BDC, the Call transaction metod and the Session method.
In LSMW, mapping is taken care of with the help of SAP, whereas in BDC one has to provide explicit mapping directions.
In BDC, we can schedule the job, so the uploading can be done at the same time or later periodically while in LSMW it has to be done at once only.
So through LSMW, one cannot upload huge amount of data. Hence we use LSMW for updating or inserting below 5000 records and we use BDC to upload records more than 5000.
Coding is not very flexible in LSMW, whereas in BDC coding is very flexible and applications can be easily customized. this is mainly because LSMW is devised specially for functional consultants who do not perform coding, while BDC is mainly used by technical consultants, who perform coding
I am getting a message that I am not authorized. What do I do?
When you receive a message that you are not authorized, immediately type /nSU53 in the command bar and the “Display Authorization Data” screen will appear, showing the technical details of the authorization problem.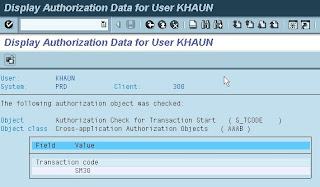 To resolve the authorization problem, you will need to e-mail your local campus coordinator explaining the problem and attach a copy of the SU53 screen. To find your campus coordinator, access the FAQ “5. Who to contact for access help.”
To create a print screen in order to e-mail it to your campus coordinator, press and hold the “Alt” button while you press the “Print Scrn” button on your keyboard. This will capture the screen for you. Then press and hold the “Ctrl” button while you press the “c” button to copy the screen. Paste the screen into a word processing document by pressing and holding the “Ctrl” button while you press the “v” button.
 To resolve the authorization problem, you will need to e-mail your local campus coordinator explaining the problem and attach a copy of the SU53 screen. To find your campus coordinator, access the FAQ “5. Who to contact for access help.”
To create a print screen in order to e-mail it to your campus coordinator, press and hold the “Alt” button while you press the “Print Scrn” button on your keyboard. This will capture the screen for you. Then press and hold the “Ctrl” button while you press the “c” button to copy the screen. Paste the screen into a word processing document by pressing and holding the “Ctrl” button while you press the “v” button.
Subscribe to:
Posts (Atom)